
FreeDes
FREE Design Education

> Design Entrance Study materials for FREE. > Learn CEED, UCEED, NID, NIFT & NATA and crack exams for FREE.


FreeDes 2026
A designer needs,
Tools that play an essential role in learning to sketch and design by facilitating the communication of ideas on paper. Here’s how basic tools contribute to your design illustrations and learning process:
When Amazon Supports,
A collaboration to support design education by providing essential tools and offers an opportunity for students and professionals to discover products that can enhance their learning and works with amazing discounts for website users.

Did You Know?
Activate Amazon Prime Student Membership, by clicking on it, Get First 06 months FREE - Amazon Prime + Linkedin Premium: Student Subscription.
This Offer Expires on 31 March 2025.
--------------------------------------------
FreeDes 2025 comes with New Year 2025 Gifts for all users. Visit Amazon in here to receive discounts & unique offers on Amazon website. FreeDes offers free learn support, all payments carried out with Amazon only,

Basic Tools
The physical tools are indispensable for design students as they learn to sketch and communicate ideas effectively. By engaging with traditional sketching methods, designers can enhance their creativity, develop essential skills, communicate more clearly, and explore their ideas in a tactile manner. This foundational practice not only enriches their learning experience but also prepares them for successful careers in various design fields.
Sketching Book
Selecting the right sketching book involves understanding your current skill level, the topics you wish to explore, and your preferred learning style. By considering these factors, you can find resources that will enhance your sketching abilities and inspire your artistic journey.
These resources are shared as per recommendations' received from the designers and students across India and Europe.
 Drawing on the Right Side of the Brain by Betty Edwards |
|---|
 Keys to Drawing by Bert Dodson |
 Figure Drawing: Design and Invention by Michael Hampton |
 The Complete Urban Sketching Companion - Gabriel, Stephanie & Shari |
 How to Draw Architecture: Illustrating Buildings and Cityscapes by Markus Agerer |
 The Urban Sketching Handbook: Techniques for Beginners by Suhita Shirodkar |
 Sketching for the Absolute Beginner by Peter Cronin |
 The Beginner’s Guide to Urban Sketching |
 Sketching Techniques for Artists by Alex Hillkurtz |
 Sketching People by Lynne Chapman |
 Creative Sketching Workshop by Pete Skully |
 The Urban Sketching Handbook: Architecture and Cityscapes by Gabriel Campanario |
 The Urban Sketching Handbook: People and Motion by Gabriel Campanario |
Skill Level
1. Beginner
- Sketching for the Absolute Beginner by Peter Cronin: This book is ideal for those completely new to sketching. It introduces fundamental concepts using the S.E.T. (Shape/Edge/Tone) method, making it easy to grasp basic techniques.
- The Beginner’s Guide to Urban Sketching: Focuses on urban environments and is perfect for beginners wanting to explore sketching in real-world settings.
2. Intermediate
- Sketching Techniques for Artists by Alex Hillkurtz: A comprehensive guide that covers more complex topics suitable for those with some experience.
- Sketching People by Lynne Chapman: This book helps artists improve their skills in drawing figures and faces, addressing common challenges faced by intermediate sketchers.
3. Advanced
- Creative Sketching Workshop by Pete Skully: Aimed at advanced artists, this book offers challenges and exercises from various urban sketchers, encouraging creativity without step-by-step instructions.
- Urban Sketching: If you are interested in capturing cityscapes or everyday life, look for books specifically focused on urban sketching techniques.
3.1. The Urban Sketching Handbook: Techniques for Beginners by Suhita Shirodkar, This book is perfect for beginners, covering essential skills for sketching architecture, people, and everyday objects on location. It includes exercises on value, color mixing, and perspective, making it a practical guide for enhancing observational and drawing skills.
3.2. The Urban Sketching Handbook: Architecture and Cityscapes by Gabriel Campanario, This handbook provides practical tips on drawing various architectural styles and cityscapes. It emphasizes key principles such as composition, depth, scale, contrast, and creativity, making it suitable for artists at all skill levels who wish to develop their unique style.
3.3. The Urban Sketching Handbook: People and Motion by Gabriel Campanario, Focused on capturing human forms and their movements, this book offers techniques to make the experience of drawing people enjoyable and rewarding. It covers composition and line work, helping artists to depict motion effectively.
3.4. How to Draw Architecture: Illustrating Buildings and Cityscapes by Markus Agerer, Learn to draw and design your own buildings and cityscapes. To effectively draw your own architectural representations, you will learn how to draw the important elements of buildings, like roofs, trusses, but also trees with Step-by-step instructions for complete architectural drawings and about building styles, construction techniques, materials, for beginners.
3.5. The Complete Urban Sketching Companion - Gabriel, Stephanie & Shari. This comprehensive guide compiles essential concepts and techniques from various urban sketching handbooks, providing a well-rounded approach to the art form. It's ideal for those who want a deeper understanding of urban sketching practices.
- Figure Drawing: Books like Figure Drawing: Design and Invention by Michael Hampton are recommended for those wanting to master human anatomy and proportions.
- General Techniques: For a broader approach, consider books that cover various techniques and styles, such as Keys to Drawing by Bert Dodson or Drawing on the Right Side of the Brain by Betty Edwards, which focus on foundational skills and perception.
Did You Know?
FreeDes Donations & Contributions
As part of sharing resources and supporting students, FreeDes can purchase your design books or resources for half - price and publish it to this website with your name and photo on it. To celebrate your contributions towards FreeDes resource sharing platform together we form a network, in helping those who can't afford the same with this website.
NO copyright documents or same copies of the files are encouraged for contribution but can be shared as a donation.

FreeDes - Telegram's Old Design Study Material Hub.
The old study materials, collected and reshared from the FreeDes channel by students/members have been circulating in various groups for years without any update or addition of new study materials available to cope with recent changes in design exam preparation because FreeDes halted sharing the same in Telegram.
To ensure the information/resources shared are available for FREE, this website will be updated monthly to refrain from misuse of its resources and to provide unlimited high quality study pathway to its users. If you find this FreeDes initiative helpful for your preparation don't forget to share your reviews and suggestions so that Freedes can share them on this website.


Pencil - Sketching / illustration
Sketching and illustration play vital roles in the creative process. Understanding their differences helps artists choose the appropriate technique based on their goals—whether it's exploring ideas through sketching or creating polished illustrations for communication.
Each skill complements the other; mastering sketching can enhance illustrative capabilities by providing a strong foundation for more intricate designs
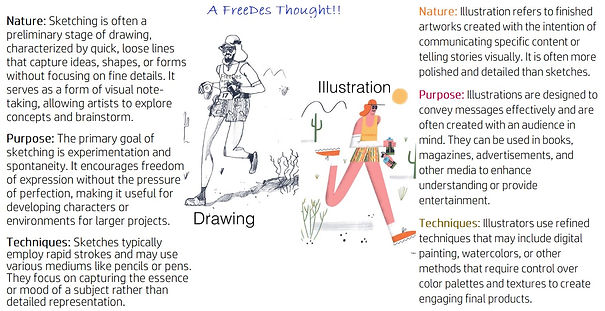

For NID, UCEED and CEED Design Exams,
When the Question say Illustrate a Product/ Design a concept - It refers to finished art works created with the intention of communicating specific content. Rough Sketches / drawings are shown to share the pathway used to create the Illustration. Attempting Illustrative questions with Sketches alone can't help to score in Sketching.
When learning to sketch and illustrate, the choice of pencils is crucial for achieving various effects and styles. Here’s a detailed overview of suitable pencil types, their characteristics, and sketching possibilities.Types of Pencils for Sketching and Illustration
1. Graphite Pencils: Graphite pencils are the most common choice for sketching and come in a range of hardness levels, indicated by a scale from H (hard) to B (soft).
Hard Pencils (H, 2H, 4H, etc.):
Characteristics: Produce fine, precise lines; less smudging.
Best For: Technical drawings, fine details, and light sketches.
Medium Pencils (HB, F):
Characteristics: Versatile; good balance between hardness and softness.
Best For: General sketching and writing.
Soft Pencils (B, 2B, 4B, 6B, etc.):
Characteristics: Softer leads produce darker marks; great for shading.
Best For: Artistic sketches, shading, and tonal variations.
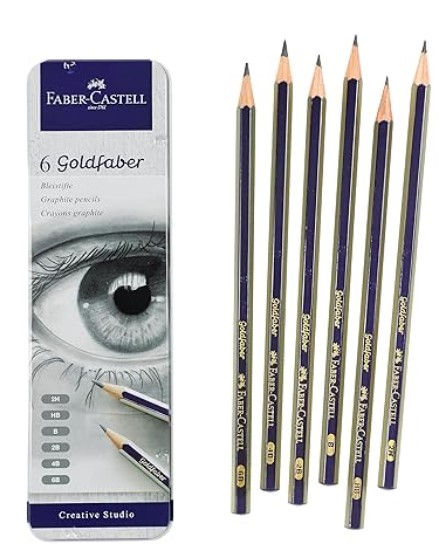
Recommended Graphite Pencil Brands
Caran d’Ache Grafwood: High-quality range from 9B to 4H; excellent for detailed work.
Derwent Graphic Pencils: Good quality with a full range from 9B to 9H; versatile for various styles.
Prismacolor Turquoise: Affordable option with a range from 6B to 6H; suitable for general sketching.
Faber-Castell 9000: Known for reliability and control across a wide range from 6H to 8B.

Caran D'Ache Grafwood Extra-fine 6 graphite pencils 9B,7B,5B,3B,HB,2H in Metal tin pack

Quality - 34214 (Set of 12, 6B-4H)

Prismacolor Premier Turquoise Graphite Sketching Pencils, Soft Leads, 12 Pack
6 Graphite Pencils (2H, HB, B, 2B, 4B, 6B)
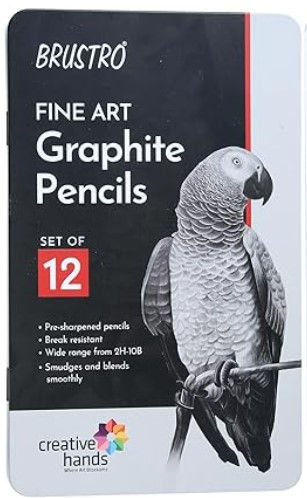
Brustro Artists Fineart Graphite Pencil Set of 12 (10B-2H) is designed for artists and learners, offering a versatile range of graphite pencils suitable for various sketching and drawing techniques.
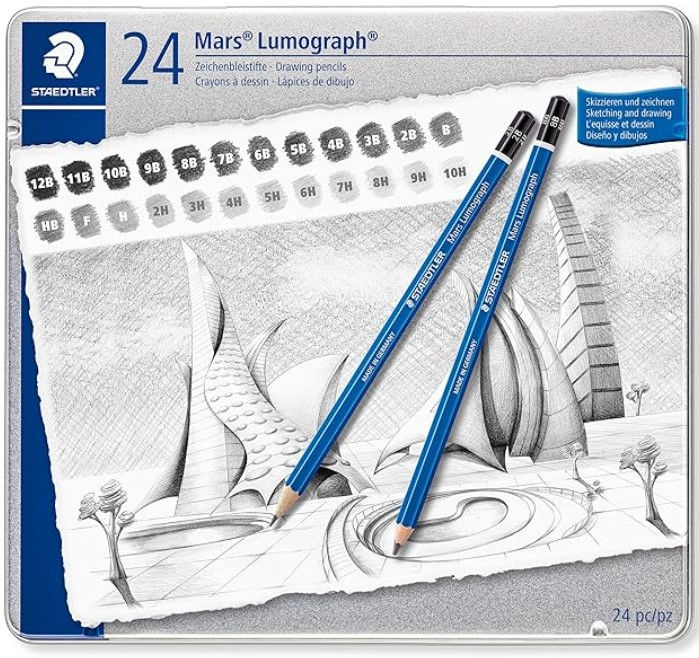
In 24 Degrees From 10H To 12B Degree Pencil Set (Pack Of 24)|Black

Recommended Pencil Set
10B, 8B, 7B, 6B, 5B, 4B, 3B, 2B, B, HB, H, 2H
This range allows for a wide spectrum of shading and detailing options, from very soft pencils (10B) for deep dark lines to harder pencils (2H) for fine details
FreeDes Recommendation:
1. Technical Drawing: Use harder pencils (2H to H) for clean lines and precision.
2. Portrait Sketching: Utilize softer pencils (2B to 6B) for depth and shading in facial features.
3. Landscape and Urban Sketching: A mix of medium (HB) and soft pencils (4B to 8B) can provide texture and contrast in natural scenes.
4. Concept Art and Illustrations: Soft pencils (5B to 9B) are ideal for creating dynamic sketches with rich tones.
5. Shading Techniques: Employ a range from hard (H) for light shading to soft (8B) for deep shadows.

Mechanical Pencil Vs Pencil
Mechanical pencils were never meant to replace wooden pencils but were designed to produce consistent, accurate, precise lines. Which is difficult to achieve with a wooden pencil.
Wooden pencils are predominantly used for drawing; the pencil’s tip can be sharpened in different ways to give other effects. Depending on the type of sharpener, the cone can be sharpened to wider or smaller diameters with long sharp points or more rounded duller points.
When artists are first learning how to draw, they are taught to use the fine point for more detailed work and angle the pencil when they need to create broader strokes or shading.
There are some disadvantages to using wooden pencils for drawing. The main ones are that the pencil needs to be sharpened quite frequently, and as you sharpen it, the pencil becomes smaller and smaller. Once a pencil becomes too small to hold in hand comfortably, many people will use a pencil extender.
For architects, draughtsmen, and cartographers, mechanical pencils and professional drafting pencils come into the basic requirements.
Wooden pencils are not generally used for technical drawing, plotting, and map-making as the tip of the pencil requires constant sharpening and cannot produce specific line widths. However, their points can be sharpened to a point finer than that which can be achieved with a mechanical pencil and are still used by some professionals.
For NID, UCEED and CEED Design Exams,
Pencil types play a major role in these exams. Mechanical pencils maintain a consistent line width, which is ideal for detailed works, product sketches and technical drawings. The lead diameter remains the same throughout use, eliminating the variability, refilled with leads of various hardness levels (e.g., 6H to 4B), providing flexibility in hatching, creating patterns and detail work. Wooden pencils, especially softer grades (e.g., B or 2B), allow for a range of techniques, including shading using the side of the pencil lead. This flexibility is beneficial for creating smooth gradients and textures in sketches, Softer leads can create rich dark tones and are easier to blend when shading, making them suitable for expressive sketches. Use your pencil wisely for the sketching part.

Choosing the right mechanical pencil for product sketching and rendering involves considering several factors, including lead size, grip comfort, durability, and specific features that enhance precision and control.
1. Lead Size
-
Common Sizes: Mechanical pencils typically come in lead sizes of 0.3mm, 0.5mm, 0.7mm, and 0.9mm.
-
0.3mm: Ideal for fine details and intricate work.
-
0.5mm: A versatile choice suitable for both detailed sketches and general use.
-
0.7mm: Good for bolder lines and shading.
-
0.9mm: Best for creating thick lines and filling in larger areas.
-
2. Eraser Quality
-
A built-in eraser can be a valuable feature, especially when making adjustments during sketching. The Pentel Twist Erase III, for example, has a large twist-up eraser that extends its usability.

Pentel Orenz XPP502-A Mechanical Pencil, 0.008 inch (0.2 mm)

Rotring Tikky Black Barrel 0.50mm Mechanical Pencil

Rotring 0.7mm Mechanical Lead Pen Pencil

Pentel Graph Gear 800 0.7Mm
In 24 Degrees From 10H To 12B Degree Pencil Set (Pack Of 24)|Black
Some mechanical pencils offer unique features such as: Rotating Lead Mechanisms: Like the Uni Kurutoga Pipe Slide, which rotates the lead while drawing to maintain a consistent point. Built-in Lead Indicators: To easily identify lead hardness without opening the pencil.
0.2mm, 0.3mm, 0.4mm, 0.5mm, 0.7mm, 0.9mm, 1.15mm, 1.13mm, 2.0mm, 3.2, 5.2mm, and 5.6mm
Recommended Pencil Set
Pentel makes the Pentel Orenz 0.2mm mechanical pencil and a 0.2mm lead to go with it. Mechanical Pencils 0.3mm typically 5 degrees of hardness 2H, H, HB, B, and 2B, Mechanical Pencils 0.5mm typically 9 degrees of hardness 4H – 4B, Mechanical Pencils 0.7mm typically 9 degrees of hardness 4H – 4B, Mechanical Pencils 0.9mm typically 4 degrees of hardness H, HB, B, and 2B.

Graphic Tablet
When selecting a graphic tablet for drawing, several key factors should be considered to ensure the device meets the needs of the artist. Here are the most important criteria: Key Factors recommended by FreeDes,
Active Area: The active area refers to the portion of the tablet where you can draw. It is essential to choose a size that fits your drawing style and workspace. Larger screens provide more comfort and detail visibility, while smaller tablets are more portable.
Pressure Sensitivity: Pressure sensitivity is crucial for achieving varied line thickness and opacity based on how hard you press the stylus. Most modern tablets offer between 2,048 to 8,192 levels of pressure sensitivity, with higher levels allowing for more nuanced control over your artwork. A minimum of 2,048 levels is generally recommended for satisfactory performance.


When choosing a Wacom tablet as a beginner, consider whether you prefer a pen tablet (like the One by Wacom or Intuos S) or a pen display (like the Wacom One). Each option provides unique benefits suited to different learning styles and preferences, allowing new artists to explore digital illustration effectively without overwhelming costs.
Screen Type
The three main types of drawing tablets:
Pen Tablets: Require an external display; they are often more affordable but less intuitive.
Pen Displays: Feature a built-in screen that allows you to draw directly on the display, providing a more natural experience.
Pen Computers: General-purpose tablets (like iPads) that support drawing apps and have touch functionality
Screen Size Matters the Most !!
A tablet's active area should ideally match the aspect ratio of the monitor being used (e.g., 16:9 or 16:10). This alignment helps in creating a seamless transition between drawing on the tablet and viewing the output on the screen.
A larger surface allows for more fluid and natural hand movements, making it easier to create intricate designs, with more extensive drawing area, which is beneficial for detailed work and complex illustrations.


Compatible & Customise
Ensure that the tablet is compatible with your preferred software and operating system. Additionally, consider the availability of accessories like stylus pens and other peripherals that enhance functionality.
Look for tablets that allow you to customize buttons for shortcuts and other functions, which can streamline your workflow. Some tablets also offer multitouch capabilities for added convenience during use.
Professional Design Tablets:
1) Xencelabs Medium Pen Tablet
2) Veikk VK2200 Pro
3) Huion Kamvas Pro
4) XP Pen Artist Pro 16
5) Wacom Cintiq 22 (FreeDes Recommend)


Laptop / Desktop
When selecting a laptop or desktop for design, especially for beginners aiming to progress to a professional level, it's crucial to consider specifications that can handle demanding software and multitasking. FreeDes recommends these minimum specifications in it.